Right now, your service worker file is empty. An empty service worker file won’t do anything by default. That might sound obvious, but it’s a very deliberate design decision. There are plenty of technologies that try to anticipate your needs and provide you with default behaviors without you having to specify anything. That sounds great—unless those default behaviors are not what you wanted.
I realize I’m being quite vague, so I’ll be more specific. But I warn you, I am about to drag some skeletons from the darkest depths of the browser and out into the light. Huddle a little closer to the campfire, and I’ll position this flashlight under my chin while I tell you a tale…
What if I told you that service workers aren’t the first technology to enable websites to work offline? There was a previous attempt to solve the offline problem using a technology called Application Cache, or AppCache for short. If you haven’t heard of AppCache, that’s good. We try not to speak its name. Those poor unfortunate souls who dabbled too deep in the dark arts of AppCache have banished it from their minds, lest they be driven out of their wits by such painful memories.
AppCache was forged in the fires of the standards process, hidden from the gaze of mortal web developers. The spec was then triumphantly unveiled. “Behold!” cried the standard bearers, “We’ve given you a way to make your sites work offline!” Web developers eagerly took hold of this new knowledge, implemented AppCache, and promptly broke their websites.
It all looked so good on paper (and on mailing list). You created a new file called an application manifest. In that manifest, you listed which files should be cached. From then on, the listed files would always be retrieved from the cache instead of from the network.
It seemed straightforward enough, but the devil was in the details. In order to tell the browser where the manifest file lived, you needed to point to it using a manifest attribute in your document’s html element. As soon as you did that, the HTML file was automatically added to the list of files to be cached. It didn’t matter if you updated the HTML—your users would still see the stale version from the cache. Trying to break this stranglehold on your site meant entering a painful world of cache invalidation. It was a mess.
AppCache sounded great in theory, but fell apart in practice. In retrospect, the root of the problem seems obvious. Instead of consulting with developers on the functionality they wanted, the spec was created by imagining what developers wanted. It makes more sense to give developers the tools they need to create their own offline solutions, than giving them an inflexible technology that only works in limited situations.
Giving developers access to the building blocks they need to craft their own solutions is the driving force behind an idea called the extensible web. There’s even a manifesto:
Our primary goal is to tighten the feedback loop between the editors of web standards and web developers. We prefer an evolutionary model of standardization, driven by the vast army of web developers, to a top-down model of progress driven by standardization. (http://bkaprt.com/go/03-01/) Stirring stuff. It makes me want to storm the barricades (and replace them with well-designed, standardized barricades).
Whereas AppCache added a layer of “magic” on top of the work the browser was doing under the hood, service workers expose the true inner workings of the browser.
Browser vendors should provide new low-level capabilities that expose the possibilities of the underlying platform as closely as possible. (http://bkaprt.com/go/03-01/) Developers then have to provide step-by-step instructions to browsers detailing exactly what we want to happen. That’s more work than the straightforward, declarative approach of AppCache, but it’s also more empowering. Writing JavaScript is the price we pay for these newfound powers.
That’s why your service worker file isn’t doing anything yet. You need to fill it with instructions first. That means you need to decide what you want your service worker to do.
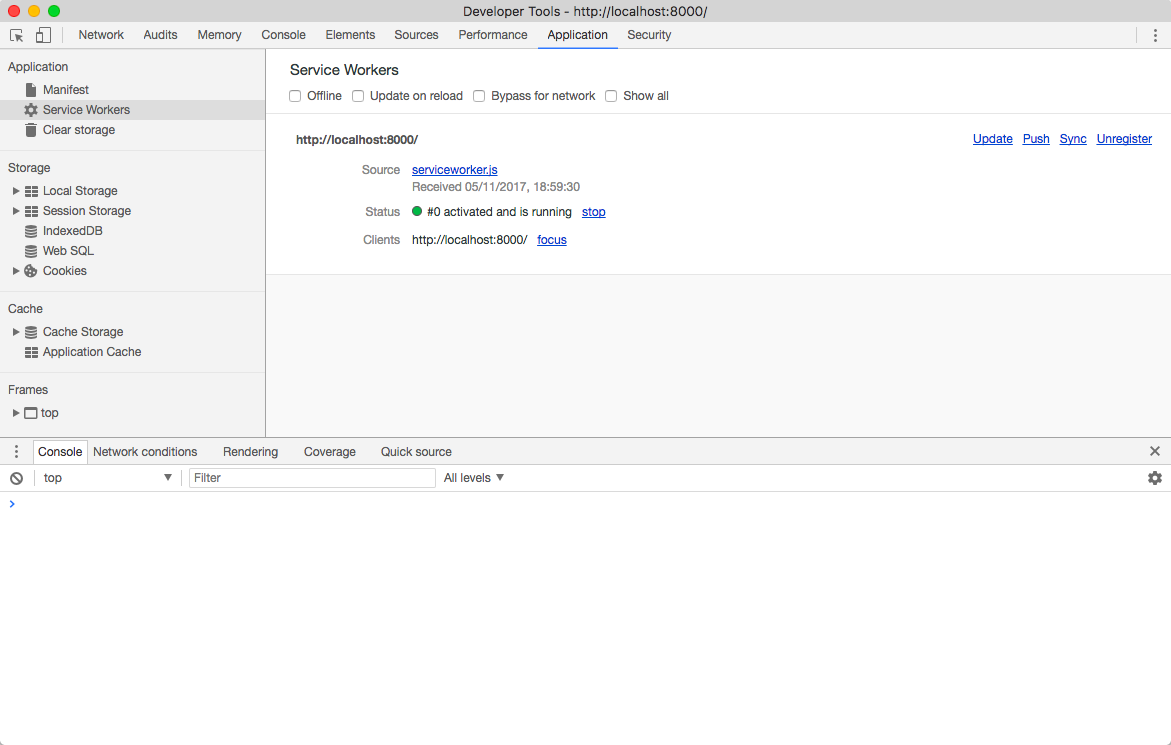
An empty service worker file won’t do anything, but it still gets installed on the user’s machine. You can see this for yourself by looking in your browser’s development tools. I recommend using Chrome for this. Visit the local version of your site—the one with the service worker registration code in the HTML—and open up Developer Tools (alt+cmd+i). Click on the Application panel. Then, from the menu in the sidebar, select Service Workers (Fig 3.1).

This shows that a service worker has been activated, like a sleeper agent in a Cold War thriller. Now it’s time to add some JavaScript to that empty service worker file, serviceworker.js.
When you write JavaScript that’s going to be executed by a web browser, it often follows this pattern:
The event you’re listening out for could be triggered by the user—clicking, scrolling, or hovering, for instance. You can then use that event as your cue to do something—show some information, trigger an animation, or make an Ajax request to the server.
It’s a similar situation with service workers. You can still write code that listens for events, but this time the events are triggered by the browser itself as it goes about its business. The way that a browser works its magic is through the fetch event.
When you click on a link or type a URL into the browser’s address bar, that triggers the fetch event—the browser will “fetch” that document from the web. If that HTML document has images in it, each img element will trigger another fetch event—the browser will “fetch” the files referenced in the src attributes. If the page links to a stylesheet with rel="stylesheet", that will also trigger a fetch event. The same goes for a JavaScript file referenced from the src attribute of a script element.
In your service worker script, you can listen for every single one of those fetch events. You can use addEventListener to do this:
addEventListener('fetch', function (event) {
    console.log('The service worker is listening.');
});
This is following the familiar pattern of listening for an event, and then executing some code when the event is triggered:
In the settings for the Console panel in Chrome’s DevTools, tick the “Preserve log” option—that way you’ll get a record of every fetch event. Save the changes you’ve made in the serviceworker.js file and reload the page in your browser. If you look in the Console panel of DevTools, you’ll see…nothing new. What’s going on? Why doesn’t it say, “The service worker is listening.”?
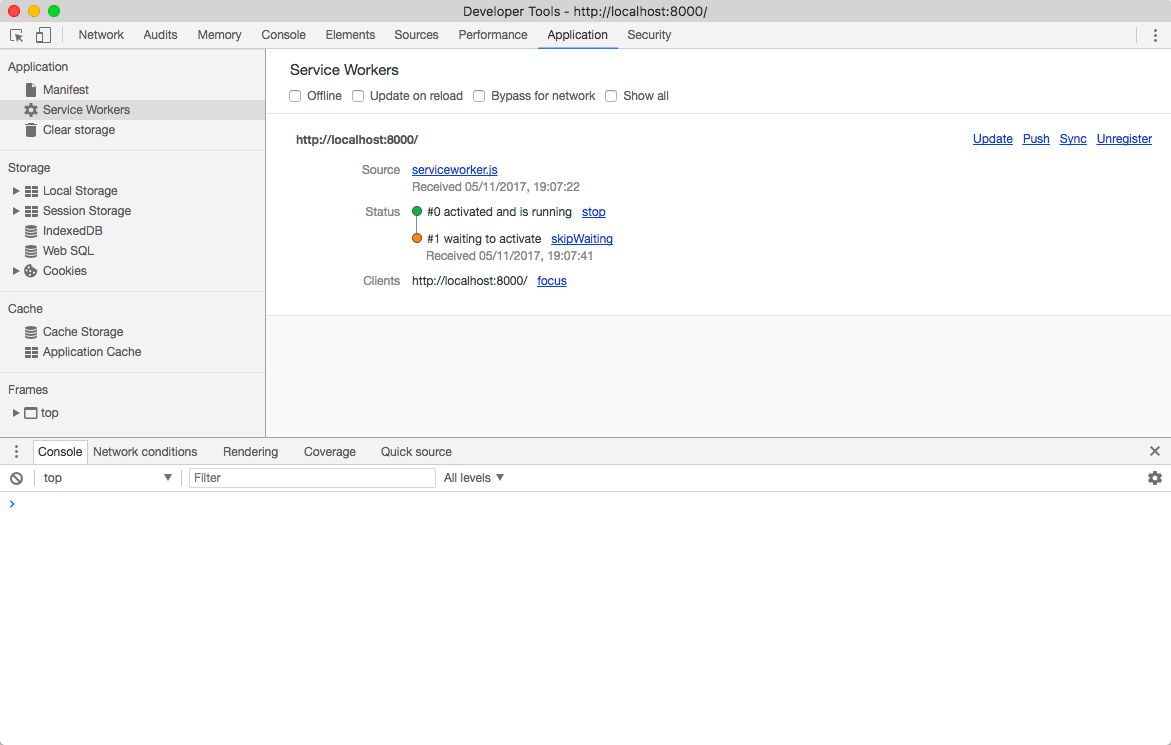
The key to unravelling this mystery is to look in the Application panel again. The status message now shows two service workers. When you edited the service worker script, the browser saw that as being a whole new service worker. It can’t swap out the existing service worker for the new one just yet, because the page currently loaded in the browser is still under the control of the original service worker (Fig 3.2).
Let’s back up for a moment and think about all the steps involved in getting a service worker up and running.
The whole process starts with registration, which you initiated from a script element in your HTML:
navigator.serviceWorker.register('/serviceworker.js');
The service worker file is downloaded. After download comes installation. This is followed by activation, when the service worker takes control of this particular browser. After activation, every request to your site will be routed through the service worker.
The first time a browser visits your site, the life cycle of the service worker seems straightforward enough:
When you update your service worker script, you aren’t updating the service worker that’s been installed on the user’s machine. Instead, you’re creating a whole new service worker. This new service worker is downloaded and installed, but it isn’t automatically activated. The new service worker is waiting in the wings, ready to be activated, but as long as the user is navigating around your site, the old service worker is still in charge.
The way that service workers get updated is similar to the way that browsers themselves get updated. If there’s a new version of Chrome, it gets downloaded in the background. But Chrome doesn’t restart without asking. Instead, it waits until you shut down the browser. Only then does it install the new version of the browser and delete the old one.
It’s the same with service workers—the update is downloaded in the background, but it doesn’t take effect until the browser is closed and reopened. Until then, it’s waiting.
So the life cycle for an updated service worker is more like this:
The new service worker will patiently wait until the user has the left your website. As long as the user has a single browser tab open with your website in it, the old service worker is active.
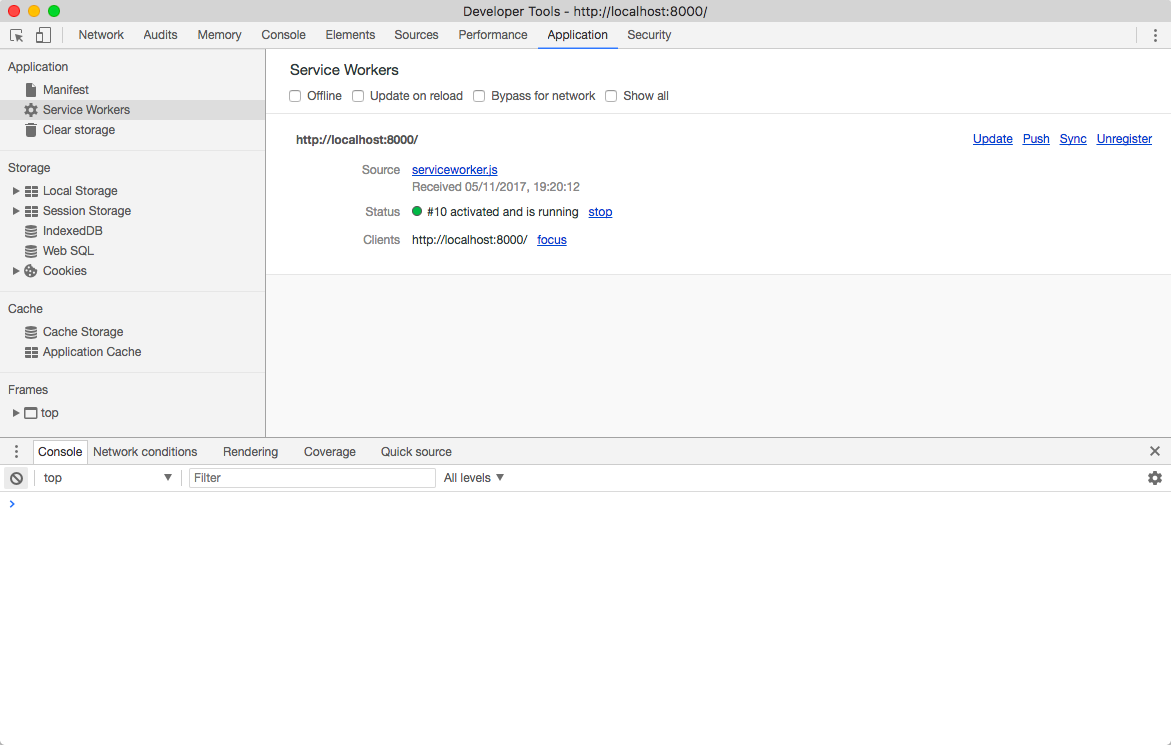
You can see the service worker life cycle in action using the Developer Tools in Chrome. Under the Service Workers section in the Application panel, you’ll see which service worker is currently active (Fig 3.3). It will have a unique number. The Status will say something like “#12345 is activated and is running.”
When you update your service worker script, a new service worker with a new number will appear, saying something like “#12346 is waiting to activate” (Fig 3.4).
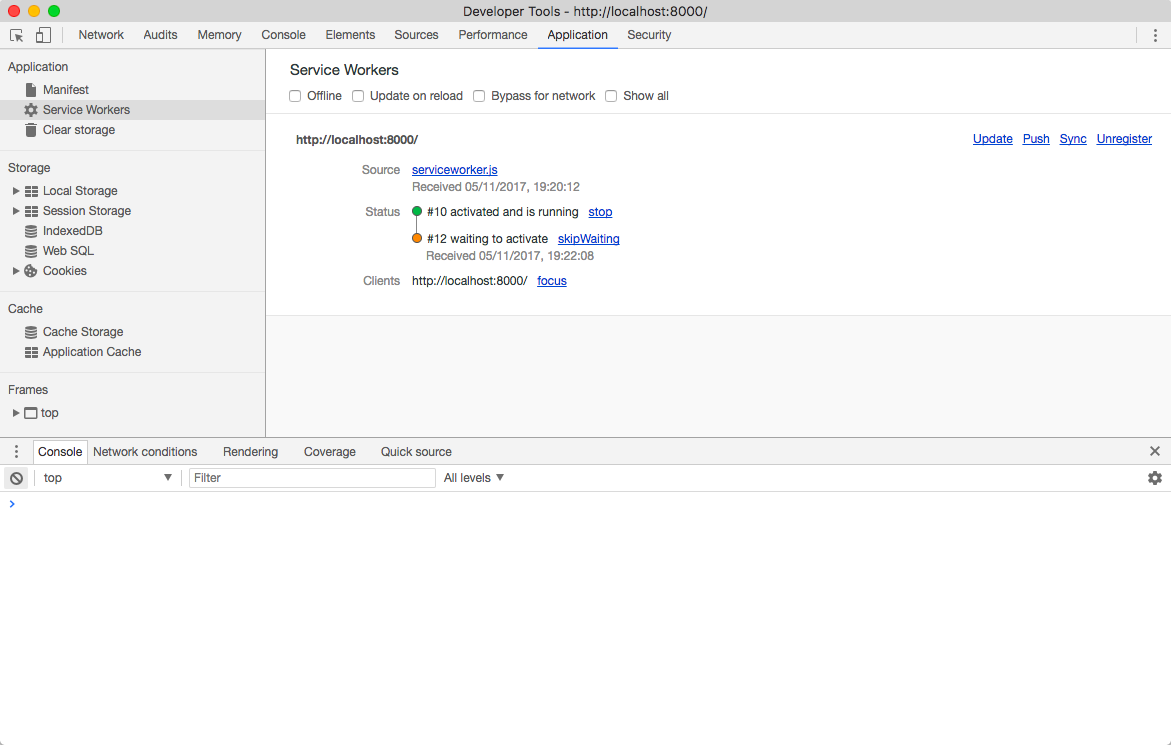
As long as you have a browser window or tab open with a domain that’s under the control of a service worker, the new version of that service worker has to wait in the wings. This can make debugging quite tricky. If you have multiple browser windows or tabs open, you need to make sure that you haven’t accidentally left one running with the old service worker in control, or none of them will get the updated service worker.
There are two things you can do to make sure the updated service worker kicks in. You can either shut down any browser windows or tabs that have localhost loaded in them, or you can use the handy skipWaiting command in the Application panel in DevTools. Then, the next time you load the page, the new service worker will be activated and the old one will fade away into oblivion.
Now when you reload the page, you’ll finally be greeted with this message in your browser console:
The service worker is listening.
When you’re working with service workers, you may find yourself refreshing your browser window many times. It’s important to note that if you do a hard refresh—pressing Shift while you refresh—you’ll bypass the service worker completely.
If you like, you can see the service worker installation and activation in action by listening to the install and activate events:
addEventListener('install', function (event) {
    console.log('The service worker is installing...');
});
addEventListener('activate', function (event) {
    console.log('The service worker is activated.');
});
addEventListener('fetch', function (event) {
    console.log('The service worker is listening.');
});
Save those changes in your serviceworker.js file. Once again, if you refresh your browser window, you won’t see any changes; your new service worker script is waiting to take effect while your page is still in the clutches of the old version. Close your browser window, or use the skipWaiting link in DevTools. Now when you reopen a browser window and navigate to your local site, you’ll see these messages:
The service worker is installing...

The service worker is activated.
As long as your browser window is open, you won’t see either message again. But every time you refresh the page, you’ll trigger a new fetch event:
The service worker is listening.
When you intercept a fetch event, you can do whatever you want with the data being passed into the anonymous function you’ve created. The data is available through the event argument you’re passing into that function:
addEventListener('fetch', function (event) {
    // Do something with 'event' data
});
You don’t have to call it event. You could call it x, y, or z if you wanted:
addEventListener('fetch', function (z) {
    // Do something with 'z' data
});
I find it’s useful to use a descriptive word like fetchEvent or event (or even just evt, as long as your future self can remember what it’s short for). It’s your code, so you can use whatever makes sense to you.
addEventListener('fetch', function (fetchEvent) {
    // Do something with 'fetchEvent' data
});
Something else you can do is use some of the fancy new JavaScript syntax that was added in ES6. I know it would make more sense if it were called JS6, but why keep things logical when they can be deliberately obscure and confusing?
One of the new syntax features is designed to remove those ugly anonymous function declarations and replace them with ASCII art in the shape of an arrow:
addEventListener('fetch', fetchEvent => {
    // Do something with 'fetchEvent' data
});
I quite like the way those new arrow functions look. Again, it’s your code so use whichever syntax makes most sense to you.
Usually I’m cautious about using new JavaScript syntax in web browsers. If a browser doesn’t understand the new syntax, it will throw an error and stop parsing the script. But that’s not going to happen inside a service worker script. Every browser that supports service workers also supports the new ES6 features. Your service worker script is a safe space for you to dabble with new syntax.
Other new additions to the JavaScript language are let and const. Previously we had to use var to create all our variables:
addEventListener('fetch', fetchEvent => {
    var request = fetchEvent.request;
});
Now we can use let for variables that will change value, and const for variables that should remain constant:
addEventListener('fetch', fetchEvent => {
    const request = fetchEvent.request;
});
In this case, you’re creating a variable called request, just so you don’t have to keep typing fetchEvent.request every time you want to examine that property.
If you output the contents of request, you’ll see quite a bit of data (Fig 3.5):
addEventListener('fetch', fetchEvent => {
    const request = fetchEvent.request;
    console.log(request);
});
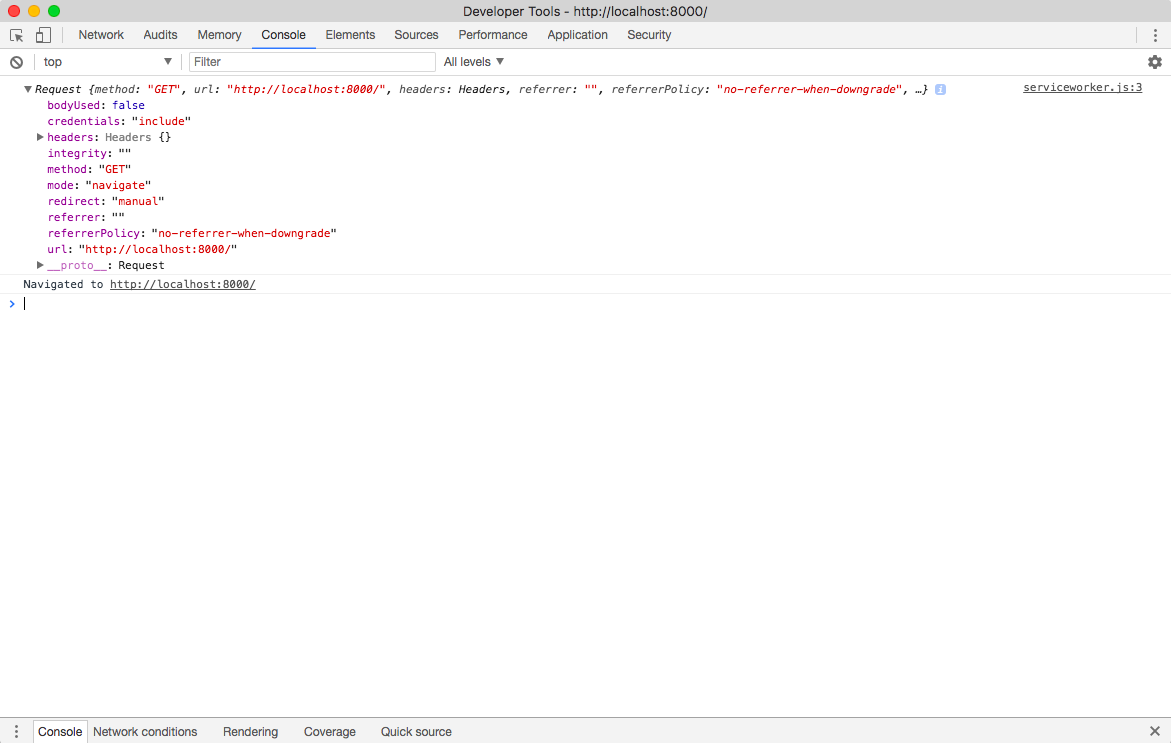
Remember, you’ll need to close down your browser tab or use the skipWaiting link in the Application panel of Chrome’s Developer Tools to apply your changes. If you don’t see the skipWaiting link, you can also use the Unregister link to delete the current service worker. Refreshing the page should install the new service worker. Refreshing the page again will allow that service worker to listen to fetch events and log its data.
In the JavaScript console, you’ll see a Request object with all sorts of properties: method, mode, referrer, credentials, and url—that’s the URL of the file that’s being fetched. All of that scrumptious information will come in handy later.
Until now you’ve been observing the fetch events that the browser is carrying out. The real power comes with altering those events.
Using respondWith, you can send back your own custom response. You can create a new Response object and put anything you like in it:
addEventListener('fetch', fetchEvent => {
    fetchEvent.respondWith(
        new Response('Hello, world!')
    ); // end respondWith
}); // end addEventListener
You’ll need to do the dance of deletion in the DevTools Application panel to see the fruits of your labor. Once your new service worker is installed, every request it intercepts will result in a page saying, “Hello, world!” and nothing else. That’s a terrible user experience, but it illustrates the power you can wield within service workers.
The Fetch API allows you as a developer to instruct the browser to fetch any resources you want, effectively recreating what the browser is doing. Granted, there’s not much point in doing this other than to demonstrate how much control you now have at your command. Later you’ll be able to use this superpower to optimize your site.
Fetching resources is an asynchronous activity, so the Fetch API uses promises like this:
fetch(request)
.then( responseFromFetch => {
    // Success!
})
.catch( error => {
    // Failure!
});
You can create a fetch event inside your service worker by using respondWith:
addEventListener('fetch', fetchEvent => {
    const request = fetchEvent.request;
    fetchEvent.respondWith(
        fetch(request)
        .then( responseFromFetch => {
            return responseFromFetch;
        }) // end fetch then
    ); // end respondWith
}); // end addEventListener
That code is telling the browser to do what it would do anyway: fetch a resource, and return with the contents of that resource.
Now you can go one step further: you can tell the browser what to do if the request for that resource doesn’t succeed. That’s what the catch clause is for. You can create a custom response in there:
addEventListener('fetch', fetchEvent => {
    const request = fetchEvent.request;
    fetchEvent.respondWith(
        fetch(request)
        .then(responseFromFetch => {
            return responseFromFetch;
        }) // end fetch then
        .catch(error => {
            return new Response('Oops! Something went wrong.');
        }) // end fetch catch
    ); // end respondWith
}); // end addEventListener
To test whether or not this is working, you’ll first have to update your service worker—do the Unregister, Reload, Reload samba in the Application panel—then take your browser offline. There’s a quick way to do this that doesn’t involve switching off your Wi-Fi or unplugging your ethernet cable: in the Service Workers panel of the Application panel in Chrome Developer Tools, there’s a checkbox labeled Offline. If you check this, it does exactly what it says on the tin—your browser is effectively offline. Reload the page while this checkbox is ticked, and you’ll see the response you crafted:
Oops! Something went wrong.
It’s not the most informative of messages, but it demonstrates that you’re no longer at the mercy of the browser’s default offline message.
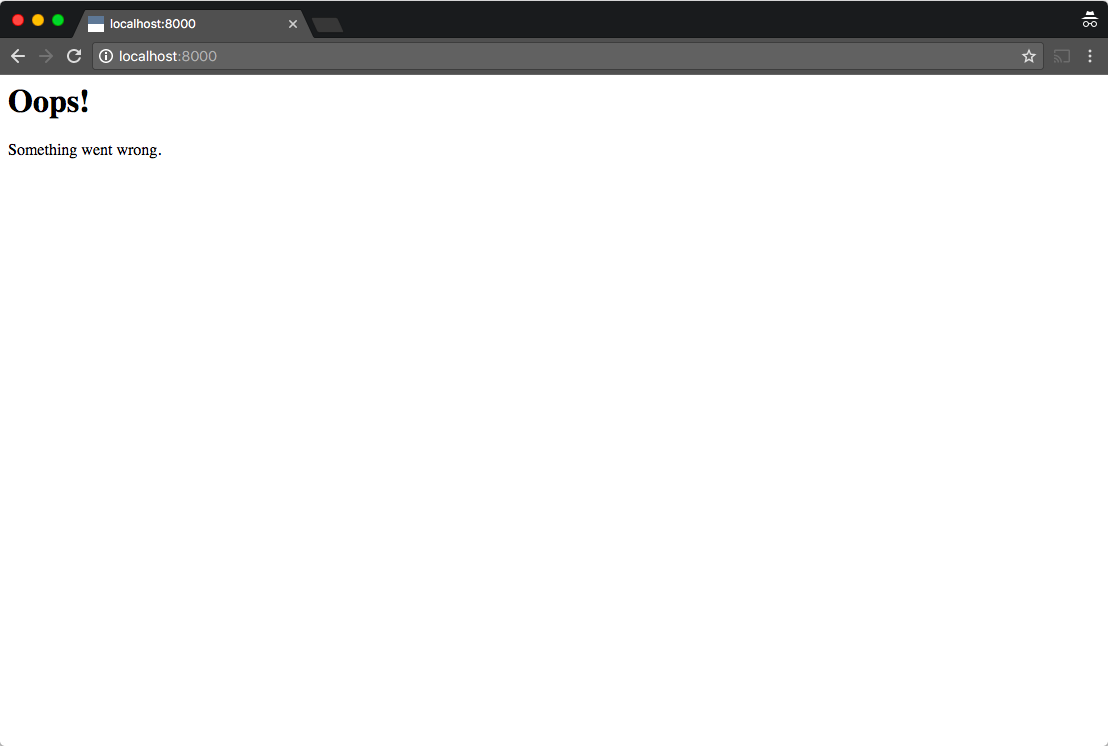
Try refining your offline message by adding some HTML:
return new Response('<h1>Oops!</h1> <p>Something went wrong.</p>');
Update the service worker in the Application panel using skipWaiting, but don’t forget to untick the Offline option before doing that. Then, when the new service worker is installed, try going offline again. This time you’ll see a different message:
<h1>Oops!</h1> <p>Something went wrong.</p>
That’s not quite right. We don’t want to see those HTML undergarments.
The message is being sent as plain text instead of HTML. You can fix that by passing in a second argument to the Response object where you can specify the headers:
return new Response(
    '<h1>Oops!</h1> <p>Something went wrong.</p>',
    {
        headers: {'Content-type': 'text/html; charset=utf-8'}
    }
);
Untick the Offline checkbox and update the service worker. Once the new service worker is up and running, tick that Offline option again and reload. This time you will see glorious HTML (Fig 3.6).
This is working nicely, but it isn’t going to scale if you want to provide a nicer offline experience. Writing an entire HTML page inside your service worker script doesn’t seem right. You’ll also probably want your offline page to have images and other assets. It would be better if you could make a standalone offline page, get the service worker to store it, and later display it whenever the user is offline. What you need is the power of caching.
Cache Me If You Can